Vue.js - part 1
Concept overview
Vue (pronounced /vjuː/, like view) is a progressive framework for building user interfaces. Unlike other monolithic frameworks, Vue is designed from the ground up to be incrementally adoptable. The core library is focused on the view layer only, and is easy to pick up and integrate with other libraries or existing projects.
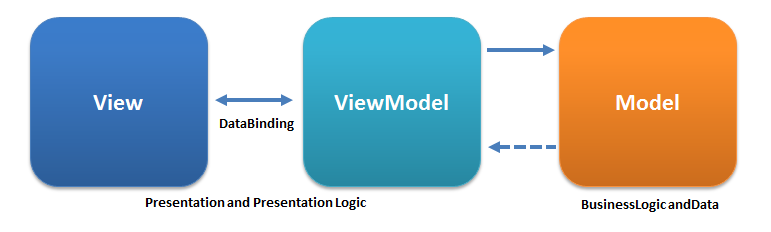
MVVM
Backend 로직과 Client 의 마크업 & 데이터 표현단을 분리하기 위한 구조로 전통적인 MVC 패턴의 방식에서 기인하였다.
간단하게 생각해서 화면 앞단의 회면 동작 관련 로직과 뒷단의 DB 데이터 처리 및 서버 로직을 분리하고, 뒷단에서 넘어온 데이터를 Model 에 담아 View 로 넘어주는 중간 지점이라고 보면 되겠다.
MVVM in Vue
View Instance - ViewModel
Every Vue application starts by creating a new Vue instance with the Vue function:
new Vue({
  el: '#app',
  data: {
    message: 'Hello Vue.js!'
  }
});
Although not strictly associated with the MVVM pattern, Vue’s design was partly inspired by it.
View Instance(Option)
| 속성 | 설명 |
|---|---|
| el | 화면이 그려지는 DOM 객체 |
| data | 화면에서 사용할 데이터를 정의하는 속성 |
| template | HTML, CSS가 포함된 템플릿을 정의하는 속성 |
| method | 화면 로직 제어와 관계된 메서드를 정의하는 속성 |
| created | View Instance가 생성되자마자 실행할 로직 정의 |
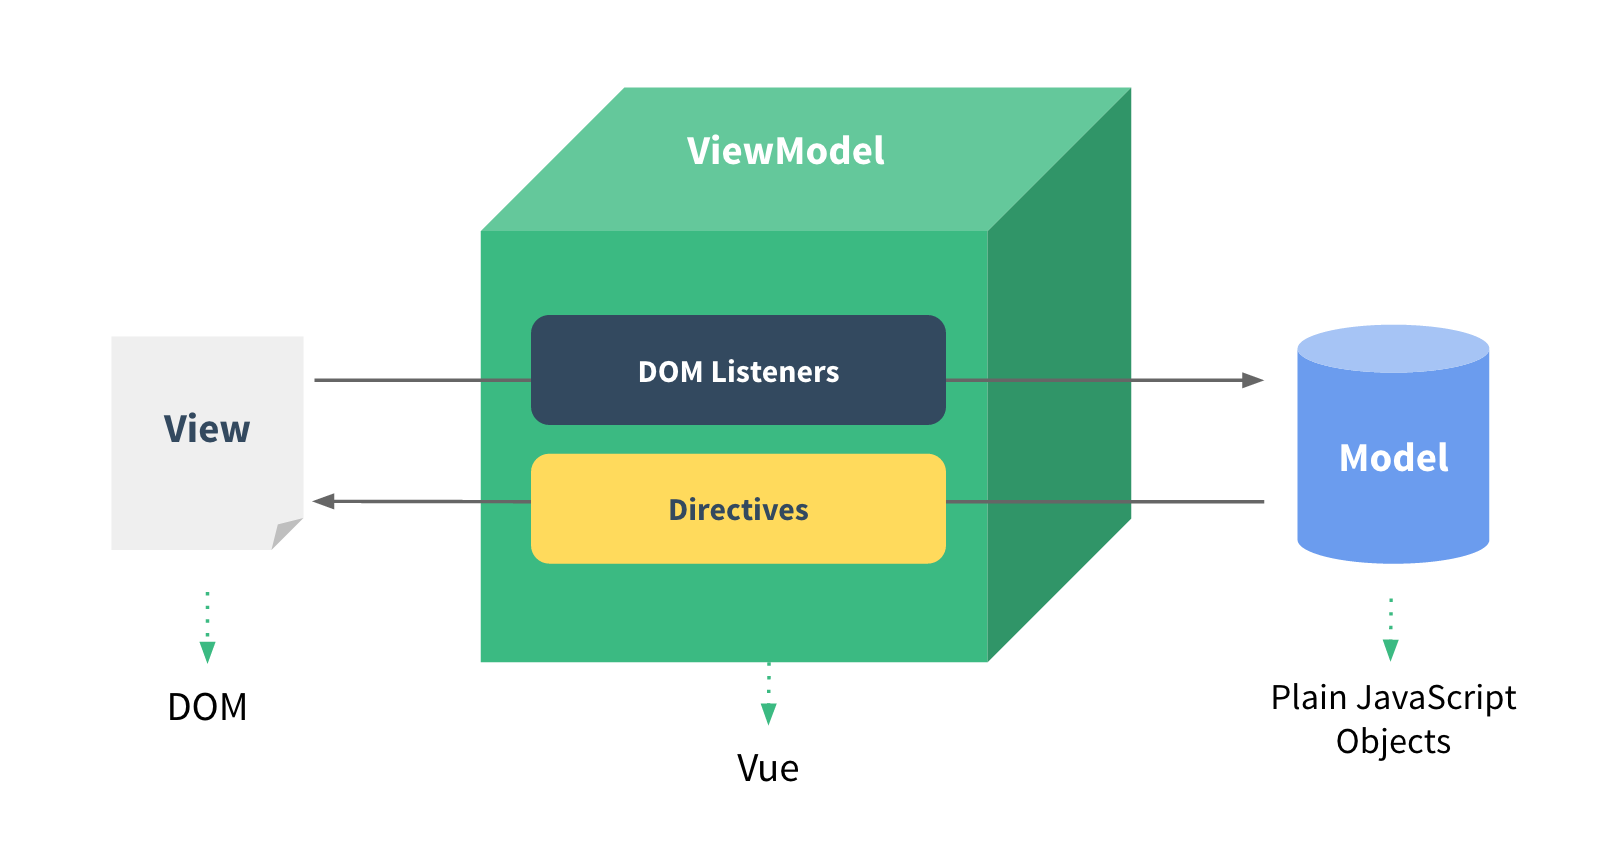
View
The actual DOM that is managed by Vue instances.
vm.$el // The View
Model
A slightly modified plain JavaScript object.
vm.$data // The Model

Directive
Prefixed HTML attributes that tell Vue.js to do something about a DOM element.
<div v-text="message"></div>
Mustache Bindings
You can also use mustache-style bindings, both in text and in attributes. They are translated into v-text and v-attr directives under the hood. For example:
<div id="person-{{id}}">Hello {{name}}!</div>
Filters
Filters are functions used to process the raw values before updating the View. They are denoted by a “pipe” inside directives or bindings:
<div>{{message | capitalize}}</div>
Quick example
<div id="demo">
  <h1>{{title | uppercase}}</h1>
  <ul>
    <li v-repeat="todos" v-on="click: done = !done"
      class="{{done ? 'done' : ''}}">
      {{content}}
    </li>
  </ul>
</div>
<script>
var demo = new Vue({
  el: '#demo',
  data: {
    title: 'todos',
    todos: [
      {done: true, content: 'JavaScript'},
      {done: false, content: 'Vue.js'}
    ]
  }
})
</script>
뷰 인스턴스 유효 범위
View Instance에 정의된 속성은 View Instance가 부착된 DOM 영역에서만 유효.
뷰 인스턴스 Lifecycle

- 인스턴스 생성
new Vue() - 이벤트 및 라이프 사이클 초기화 =>
beforeCreate - 화면에 반응성 주입 =>
created - el, template 속성 확인 =>
beforeMount - $el 생성 후 el 속성 값을 대입 =>
mounted - 인스턴스를 화면에 부착
- 인스턴스의 데이터 변경 =>
beforeUpdate - 화면 재 렌더링 및 데이터 갱신 =>
updated - 인스턴스 내용 갱신
- 인스턴스 접근 가능 =>
beforeDestroy - 컴포넌트, 인스턴스 디렉티브 등 모두 해제 =>
destroyed - 인스턴스 소멸
뷰 컴포넌트
조합하여 화면을 구성할 수 있는 블록

전역 컴포넌트
여러 컴포넌트에서 공통으로 사용할 수 있는 컴포넌트 Vue.component()로 생성
<script>Vue.component('my-global-component', {})</script>
<div id="app">
  <my-global-component></my-global-component>
</div>
지역 컴포넌트
지정된 인스턴스에서만 사용할 수 있는 컴포넌트로 인스턴스에 components 속성을 추가하고 등록할 컴포넌트의 이름과 내용을 정의
<script>
new Vue({
  el: '#app',
  components: {
    'my-local-component' : { template: '<div>local component</div>'}
  }
});
</script>
<div id="app">
  <my-local-component></my-local-component>
</div>
뷰 컴포넌트 통신
- 상위에서 하위로 데이터 전달(props 속성)
- 하위에서 상위로 이벤트 전달
- 이벤트 버스로 통신
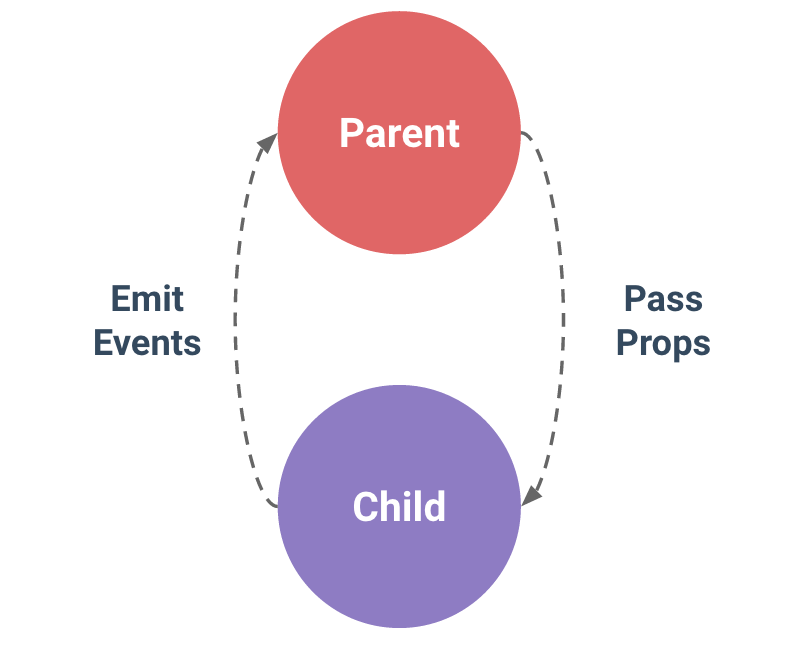
상위에서 하위로 데이터 전달
- 컴포넌트 생성시
props속성 사용 - HTML에
v-bind:속성이 포함된 컴포넌트 태그 추가
<script>
Vue.component('child-component', {
  props: ['propsdata'],
});
</script>
<child-component v-bind:props속성명="상위컴포넌트데이터의data속성">
</child-component>
상위에서 하위로 데이터 전달 예제
<script>
Vue.component('child-component', {
  props: ['propsdata'],
  template: '<p>{{ propsdata }}</p>'
});
new Vue({
  el: '#app',
  data: {message:'Hello Vue! passed from Parent Component'}
});
</script>
<div id="app>
  <child-component v-bind:propsdata="message"></child-component>
</div>
하위에서 상위로 이벤트 전달
이벤트를 발생시켜 상위 컴포넌트로 전달
<script>
//이벤트 발생
this.$emit('이벤트명')
</script>
<child-component v-on:이벤트명="상위컴포넌트메소드명">
</child-component>
하위에서 상위로 이벤트 전달 예제
<div id="app">
  <my-local-component v-on:show-log="printText"></my-local-component>
</div>
<script>
  new Vue({
    el: '#app',
    components: {
      'my-local-component' : {
        template: '<button v-on:click="showLog">showLog</button>',
        methods: {showLog: function() {this.$emit('show-log');}}
      }
    },
    methods: {printText: function() {console.log('recevied an event');}}
  });
</script>
이벤트 버스 통신
이벤트 버스를 이용하면 관계 없는 컴포넌트 간 통신을 할 수 있다. 이벤트 버스를 이용하는 경우 데이터도 추가로 전달할 수 있다.
// 이벤트 버스를 위한 인스턴스 생성
var eventBus = new Vue();

// 이벤트를 보내는 컴포넌트
methods: {
  method명: function() { eventBus.$emit('이벤트명', 데이터); }
}

// 이벤트를 받는 컴포넌트
methods: {
  created: function() { eventBus.$on("이벤트명", function(데이터) { ... }); }
}
이벤트 버스 통신 예제
<div id="app">
  <my-local-component></my-local-component>
</div>
<script>
  var eventBus = new Vue();
  new Vue({
    el: '#app',
    components: {
      'my-local-component' : {
        template: '<button v-on:click="showLog">showLog</button>',
        methods: {
          showLog: function() {eventBus.$emit('sendEvent', 'data');}
        }
      }
    },
    created: function() {
      eventBus.$on('sendEvent', function(retVal) {
        console.log('recevied an event : ' + retVal);
      });
    }
  });
</script>
v-bind Shorthand
<!-- full syntax -->
<a v-bind:href="url"> ... </a>

<!-- shorthand -->
<a :href="url"> ... </a>
v-on Shorthand
<!-- full syntax -->
<a v-on:click="doSomething"> ... </a>

<!-- shorthand -->
<a @click="doSomething"> ... </a>
뷰 라우터
- 라우팅 : 웹 페이지간 이동 방법으로 SPA에서 주로 사용된다.
- 뷰 라우터 : 뷰에서 라우팅을 구현할 수 있도록 지원하는 공식 라이브러리
| 태그 | 설명 |
|---|---|
| <router-link to=”URL값” | 페이지 이동 태그. 화면에서는 <a>로 표시되며 클릭하면 to에 지정한 URL로 이동 |
| 페이지 표시 태그. 변경되는 URL에 따라 해당 컴포넌트를 뿌려주는 영역 |
뷰 라우터 예제
<div id="app">
  <h1>뷰 라우터 예제</h1>
  <p>
    <router-link to="/main">메인 컴포넌트로 이동</router-link>
  </p>
  <router-view></router-view>
</div>
<script>
  var Main = { template : '<div>main</div>' };
  var routes = [
    { path: '/main', component: Main }
  ];
  var router = new VueRouter({routes});
  var app = new Vue({router}).$mount('#app');
</script>
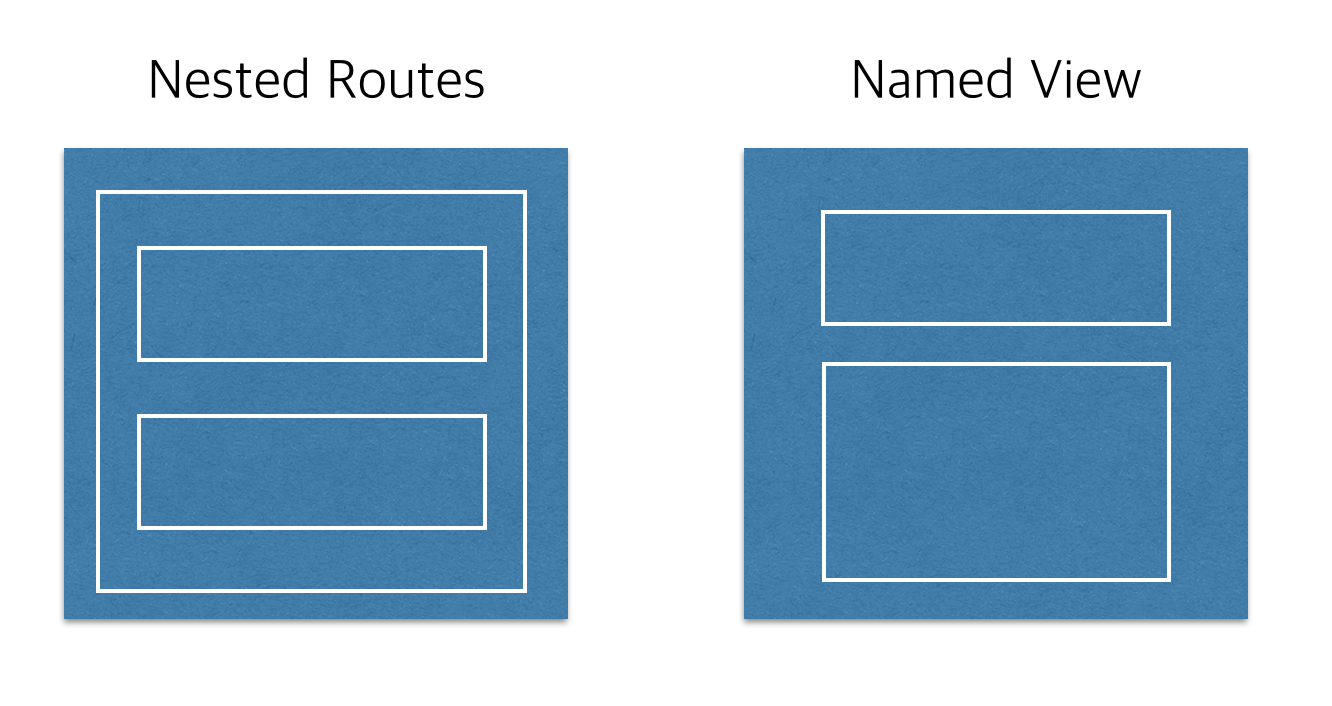
네스티드 라우터
<router-view>를 중첩하여 사용하도록 구성. route정보에 children 속성을 추가하여야 함.
<div id="app"><router-view></router-view></div>
<script>
  var User = {template: '<div>User<router-view></router-view></div>';};
  var UserProfile = { template: '<p>User Profile Component</p>'};
  var routes = [{
      path: '/user', component: User,
      children: [{path: 'profile',component: UserProfile}]
  }];
  var router = new VueRouter({routes});
  var app = new Vue({router}).$mount('#app');
</script>
네임드 뷰
name 속성을 지정하여 여러개의 <router-view>를 한번에 표시. 기본 이름은 default를 사용.
<div id="app">
  <router-view name="header"></router-view>
  <router-view></router-view>
  <router-view name="footer"></router-view>
</div>
<script>
  var Header = {template: '<div>Header Component</div>'};
  var Footer = {template: '<div>Footer Component</div>'};
  var Body = {template: '<div>Body Component</div>'};
  var routes = [{path: '/',
    components: {default:Body, header:Header, footer:Footer}}];
  var router = new VueRouter({routes});
네스티드 라우터 vs 네임드 뷰